
Summary
Article Contents
Share this article


.svg)

You finally decided to create your own online business in the form of an e-commerce shop and picked Shopify as the platform on which it shall run on. You’ve already chosen your very own products and are ready with the needed marketing strategies to implement as you go on with the steps in order to gather enough prospective customers to purchase from your shop. You’ve already got everything prepared and what’s lacking now is exploring the Shopify store backend menu so you can be familiar of everything that’s there is about Shopify.
Shopify remains as one of the top e-commerce platform out there and it isn’t showing any signs of weakening so choosing it as your shop’s e-commerce platform is but normal. In fact, it is one of the best choices you made at this stage when you’re still trying to start your online business. Shopify simply is the best e-commerce platform out there and many years of surveys and rankings reveal it. So now that you know for sure that it is going to be the platform that you’re going to use, let’s explore everything that’s in it and see what this platform is really made of.
Exploring the Store Backend Menus
Before using Shopify, you need to be able to see what it is made of, how its backend menus look like, and what are inside each menu so you can effectively navigate through it. As a storeowner, you will be working behind the scenes which means that you’ll be doing much of the work at the backend side of your shop. Everything from inventory management, sales monitoring, order processing (except if you use third-party customer management apps), and a lot of other tasks so let us explore and learn about the backend side of everything. You will see the basic Shopify store menu from the screenshot below:
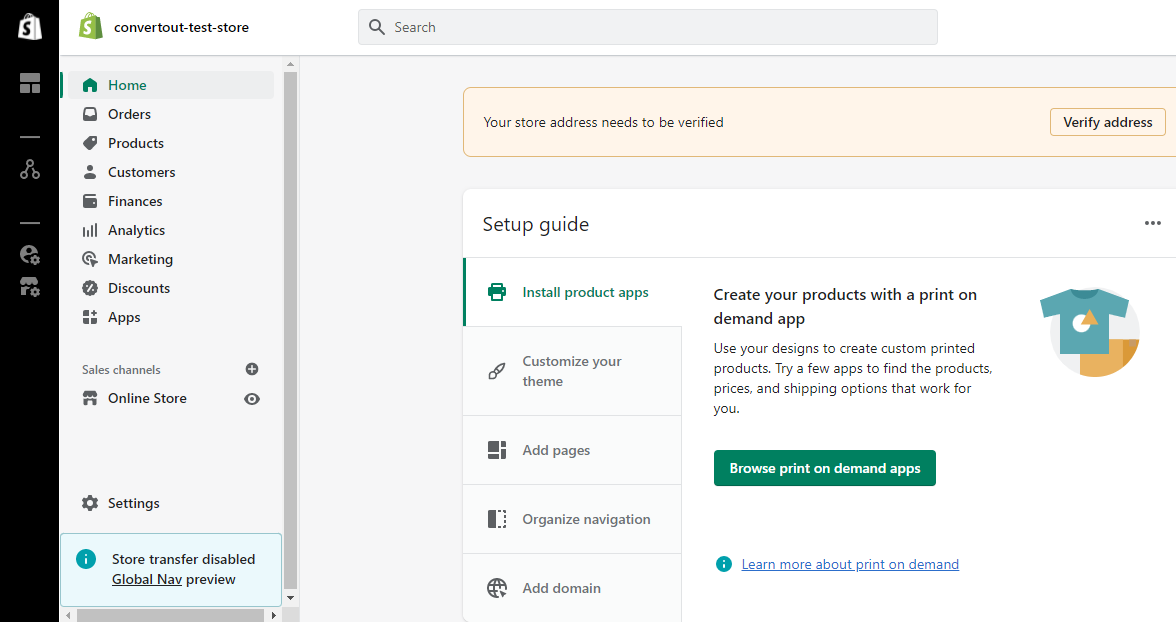
To the left of the screen are 11 menus that can look a little bit intimidating especially on your first time logging in to your shop’s backend section but don’t worry, we’re going to look into each of the component that make up the whole platform. Let’s get started with the top most menu labeled Home.
1. Home
The Home menu is where you will find guides that will teach you some of the basic stuff that you need to do while trying to create your very own online shop. It is where you will start learning about the platform and what it is all about. The Home section is designed to welcome every Shopify user into the world of Shopify and how it can be useful in many different areas in which you want to take your shop into. Steps such as installing product apps, customizing your theme, adding pages, organizing the navigation menu, adding a domain, and adding a product are just some of the items that you’ll find on top of this page.
Next are steps on how you can add options for accepting payments which customers can select from, adding a shipping policy, and many other preliminary steps that you need to make sure are all sorted out so your shop can be ready on its feet for some serious selling. That’s what’s great about Shopify, it provides its users with every possible tutorial or guide that can help smoothen the journey. They provide everything in one page and that’s what you will find in the Homepage section. It is where the basic foundational skills are going to be honed so you as the business-owner can be ready for the real thing!
2. Orders
The orders section is where you will find the orders that your customers already placed. They are the purchases that your store got so far and under the “Orders” menu are three different submenus namely “Orders”, “Drafts”, and “Abandoned Checkouts”. The Drafts section is here you will find the test orders that you will place to see if the payment channels you have setup are working great while the Abandoned Checkouts section is where the list of customers who did not finish the checkout process can be found.
These are those who made it as far as the checkout page but chose to do something else or maybe they had to do something important. But it could also mean that the customers in this list are those who were turned off from placing and paying for the items they selected because of poor checkout page design or due to a lengthy checkout process. Either way, you need to find out what is causing such abandonment and make sure that you are dealing with the cause on a timely manner before it’s too late.
3. Products
The “Products” menu, as its name already suggests, is the place where you will find all the uploaded products that your shop contains. This is where you can check the inventory, collections, and even gift cards. Under the products menu are 5 other submenus which are “Products”, “Inventory”, “Transfers”, “Collections”, and “Gift cards”. These are sections where you can manage anything that is product related and it even gives you access to a feature that you can use as a tool for customer retention in the form of gift cards.
However, since there are states and even countries that are strict in terms of gift card issuance, this submenu will seldom be used. Some Shopify store owners use third-party apps instead so they can issue discounts and vouchers or even entice loyal customers into joining an Ambassador Affiliate Program. We will explore this option in one of our future articles so for now, let us try to stick with the backend menu items.
4. Customers
Clicking on the customers menu will reveal a long list of customers that have already purchased from your shop and the great thing about that list is that there are columns showing different information which you would need in case you are going to verify or check an order from a particular customer. There is also a search tab which you can use to pinpoint an exact order since each order is assigned an order number for easier identification and tracing.
Back in the days when Shopify used to just operate on its own and didn’t welcome any third-party apps and integrations yet, the customers section has been the most often visited section of the store backend especially on matters concerning customer support. Thankfully, there are several third-party apps right now that can be used by customer support agents to make the process of responding to issues and concerns a lot faster. Oberlo, Gorgias, Zendesk, and Freshdesk are just a few of the examples here.
5. Finances
Anything that’s related to finances like your payment options, your Shopify subscription, and others are listed under the “Finances” menu. This is where you will see your upcoming bill, default payment methods, and statement of charges are found and you can go back time and again to this menu to see what the things are and payables there are as you try to operate your shop with clean finance records. This can be the most exciting, and the most intimidating menu to visit so far in this list.
6. Analytics
Want to know how well your store performs according to Google and other online search algorithms? You can glean much about it from the Analytics menu. Under this menu are three submenus which are “Analytics”, “Reports”, and “Live View” and all three are very useful for learning more about your store’s current rank and how much traffic is actually coming in from different sources. The data that you’ll find in it are quite general in scope though so you will need more advanced tools if you really want to get deeper and understand the aspects which your shop needs to improve on so it can go towards further growth and development. But for basic analytics stuff, this section can already be a good place to get started with.
7. Marketing
The next menu that you’ll find is labeled “Marketing”. It is where you will find everything that’s marketing related pertaining to your store. Under this main menu are three submenus labeled “Marketing”, “Campaigns”, and “Automations”. There’s really not much to discuss under this section since we have talked so much about marketing, the different strategies that are available for online shops to take advantage of, and we even gave some of the best ones that have worked like magic for some of the top stores out there. Marketing serves a big role in driving traffic to your website but you first need to ensure that you know which ones you’re going to use so that everything can simply fall into place. Shopify offers Marketing Automation but it’s a separate topic that we’ve reserved for a future tutorial.
8. Discounts
Obviously, this is the section where you’ll find the discount codes and promotional steps that you have set up to further advance the customer acquisition and retention strategies that you have so far implemented. This is where you can look into what is happening so far and you can even set up automatic discounts for specific orders. A “Create discount code” is also available from this section and it is where you can make your own codes to give to customers whom you deem deserving. Shopify offers this as a built-in feature but if you need more advanced discount options, you can always download apps that can help you with it.
9. Apps
The apps section is where you can find all the third-party apps that you can use to enhance your store’s features, pages, and many other aspects. There are apps that can add specific pages to your shop which pops-up on different instances and there are also those that are focused in marketing. Useful apps for building email lists and sending emails by bulk are also available. The Shopify App Store has seen a significant growth since the company opened its platform for third-party app and plugin builders and there really are a lot of them who are succeeding through the years. Apps especially those that are focused in marketing are the ones that are making it to the top spot so far and if you want to really maximize your store’s potential, using such apps will really make a great difference!
10. Online Store
Want to see what your store looks like from the point of view of your customers? It is within the “Online Store” menu where you can do so aside from manually typing your store’s URL to a browser of course. Under this menu are 5 other submenus which are “Themes”, “Blog Posts”, “Pages”, “Navigation”, and “Preferences” and each submenu will of course tell what they’re all about. What we want to emphasize though are the “Blog Posts”, “Pages”, and “Navigation” section since these three are very important as you get started.
The pages section is where you will be putting in the about us, shipping policy, and other important pages for your shop while the Blog Post section is where you will be publishing the blog/article content that you might want to produce as part of your shop’s marketing strategy. Just make sure that your copies and written pieces are optimized for SEO so they can easily be found on the web by your prospective customers. The Navigation section will give you the power in choosing which links should appear on the header part of your website as well as the footer part. If you don’t know much about arranging these navigation pages then you can start looking into the top competitor websites out there.
11. Settings
Lastly, you go to the bottom-most menu and you will find all the rest which were not mentioned above. This is where you can find important settings and sections like Store Details, Plan, Users and permissions, Payments, Checkout, Shipping and delivery, Taxes and duties, Locations, Gift cards, Markets, Sales channels, Domains, Notifications, Metafields, Files, Languages, and Policies.
We leave the exploring to your hand at this point but as you will see, this section summarizes it all so you can have a one stop page for checking and managing it all. As you explore, be sure to leave everything unclicked and untouched to ensure that there will be minimal issues that could arise as you or your Shopify developer is still on the first steps of building the shop. Shopify is really simple and you have seen it with your own eyes in this article.
Conclusion
Shopify is the best and it is going to stay as one of the best even through the upcoming years of e-commerce business domination. We’ve seen how much it’s got within the backend section and literally, there isn’t really that much when compared to the other platforms out there like WooCommerce for instance. You just need some exploring at this stage and in time, you’ll surely get a good grip at what each menu and submenu is actually used for.
This is the stage where you need to get to know what the platform is all about and once you do, Shopify will simply do its job for you in the long run. It is the best for many reasons and being simple is definitely one of them as we have actually seen every single evidence in this article.


Start your affiliate program today
Grow your Shopify store without an upfront cost.